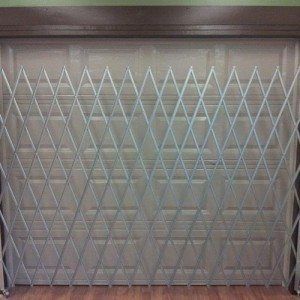
Single Fixed Gates
Security Gates for Doorways 3ft - 10ft wideDock Door Gates – Galvanized Steel Single Fixed Gates
Features:
- For standard openings, patio doors, garages, industrial and commercial use.
- One-piece scissor gates fit openings 3′ to 10′ wide and up to 8′ in height.
- In Stock, Ready to Ship
Single Fixed Gates Specifications:
- Galvanized Steel.
- Heavy-duty steel U-channels riveted back to back using aircraft quality rivets.
- Heavy duty vertical 1 1⁄2″ x 1 1⁄2″ angles, and casters.
- Galvanized finish.
- Single scissor gates lock on the right side unless specified.
Note: Scissor gates gain 6″ in height when collapsed (folded). The sizes in the chart below reflect height before the extension.
Note: We suggest you allow at least 6-8″ of room above the gate to ensure it will fit in their opening.
These Folding Single Fixed Gates secure receiving doors, lift-up doors, hallways, and entranceways while allowing light and air to circulate through the opening. Sturdy vertical gate rails mount and pivot the gate completely out of the opening.
All Scissor gates larger than 6′ are equipped with self-securing center drop pin. Comes with brackets, bearing washers and casters. Screws and locks not included. Gates have universal mounting on the face or in the casing.
Request a Quote with Shipping
Single Fixed Gates Options
| Part Number | Collapsed Height | Closed Height | Max Width |
|---|---|---|---|
| BG-S-465 | 6'6" | 6' | 3' - 4' |
| BG-S-470 | 7' | 6'6" | 3' - 4' |
| BG-S-475 | 7'6" | 7' | 3' - 4' |
| BG-S-480 | 8' | 7'6' | 3' - 4' |
| BG-S-485 | 8'6" | 8' | 3' - 4' |
| BG-S-565 | 6'6" | 6' | 4' - 5' |
| BG-S-570 | 7' | 6'6" | 4' - 5' |
| BG-S-575 | 7'6" | 7' | 4' - 5' |
| BG-S-580 | 8' | 7'6' | 4' - 5' |
| BG-S-585 | 8'6" | 8' | 4' - 5' |
| BG-S-665 | 6'6" | 6' | 5' - 6' |
| BG-S-670 | 7' | 6'6" | 5' - 6' |
| BG-S-675 | 7'6" | 7' | 5' - 6' |
| BG-S-680 | 8' | 7'6' | 5' - 6' |
| BG-S-685 | 8'6" | 8' | 5' - 6' |
| BG-S-765 | 6'6" | 6' | 6' - 7' |
| BG-S-770 | 7' | 6'6" | 6' - 7' |
| BG-S-775 | 7'6" | 7' | 6' - 7' |
| BG-S-780 | 8' | 7'6' | 6' - 7' |
| BG-S-785 | 8'6" | 8' | 6' - 7' |
| BG-S-865 | 6'6" | 6' | 7' - 8' |
| BG-S-870 | 7' | 6'6" | 7' - 8' |
| BG-S-875 | 7'6" | 7' | 7' - 8' |
| BG-S-880 | 8' | 7'6' | 7' - 8' |
| BG-S-885 | 8'6" | 8' | 7' - 8' |
| BG-S-965 | 6'6" | 6' | 8' - 9' |
| BG-S-970 | 7' | 6'6" | 8' - 9' |
| BG-S-975 | 7'6" | 7' | 8' - 9' |
| BG-S-980 | 8' | 7'6' | 8' - 9' |
| BG-S-985 | 8'6" | 8' | 8' - 9' |
| BG-S-1065 | 6'6" | 6' | 9' - 10' |
| BG-S-1070 | 7' | 6'6" | 9' - 10' |
| BG-S-1075 | 7'6" | 7' | 9' - 10' |
| BG-S-1080 | 8' | 7'6' | 9' - 10' |
| BG-S-1085 | 8'6" | 8' | 9' - 10' |
Talk to a Product Specialist About
Your Next Project: 800-448-2647
How to install a Single Fixed Gate
- Bottom of gate hinges on bearing washer and pin set into floor hole. Do not remove bottom floor pin.
- Top of gate hinges on “L” bracket bolted to wall or door frame.
- To install gates inside overhead doors, bollards or to clear obstructions, 6” or 9” extension brackets are required.
- Either side can be toward the outside of the building.
Single Fixed Gate Installation Step 1:
Before Installing decide on gate placement.“L” brackets that form top hinge allows gate placement in the recess of door
frame. Installation can also be made outside or inside of wall next to the door or opening frame.
Single Fixed Gate Installation Step 2:
Have a helper extend the gate and stand it upright where it will be mounted.
CAUTION: Check to confirm gate will swing away from opening when not in use. This will provide a clear opening for normal traffic.
- Drill 3/4”diameter x 3” deep hole, 1-1/4” from the wall into the floor for gate pin to set into.
- For 6” extension bracket drill 6” O.C. from the wall.
- For 9” extension bracket drill 9” O.C. from the wall.
Place a bearing washer over floor hole and set bottom gate pin into floor mount hole.
Single Fixed Gate Installation Step 3:
Extend gate and hang “L” bracket on top of the gate to verify where it will be mounted. To release tension you may lift the wheel 1/2”-3/4” off the floor. Mark and drill pilot holes into door frame or wall. It may be easier to drill pilot holes if you
remove the gate from its floor mount. Place the bearing washer and bottom gate pin back into floor mount. Slip “L” bracket over top of the gate and secure with 5/16” x 2” lag bolts.
Single Fixed Gate Installation Step 4:
Extend and retract gate to its stops to work out stiffness. Always raise the drop pin to keep it from dragging across the floor. Now you are done mounting the hinged side of the gate.
Single Fixed Gate Installation Step 5:
Fully extend gate across the opening, align padlock holes and position locking bar on door frame or wall. Mark and drill pilot holes. Secure with 5/16” x 2” lag bolts.
Single Fixed Gate Installation Step 6:
With gate fully extended across opening mark the floor center drop pinhole onto the concrete floor. Drill a 3/4”diameter x 3” deep hole. Lower drop pin (Note: some larger gates have an additional pin in the center of each web, mark and drill these last.) Secure gate to locking bar with 1/2” shaft diameter padlock.
Open gate slowly at first to avoid warping